 Save
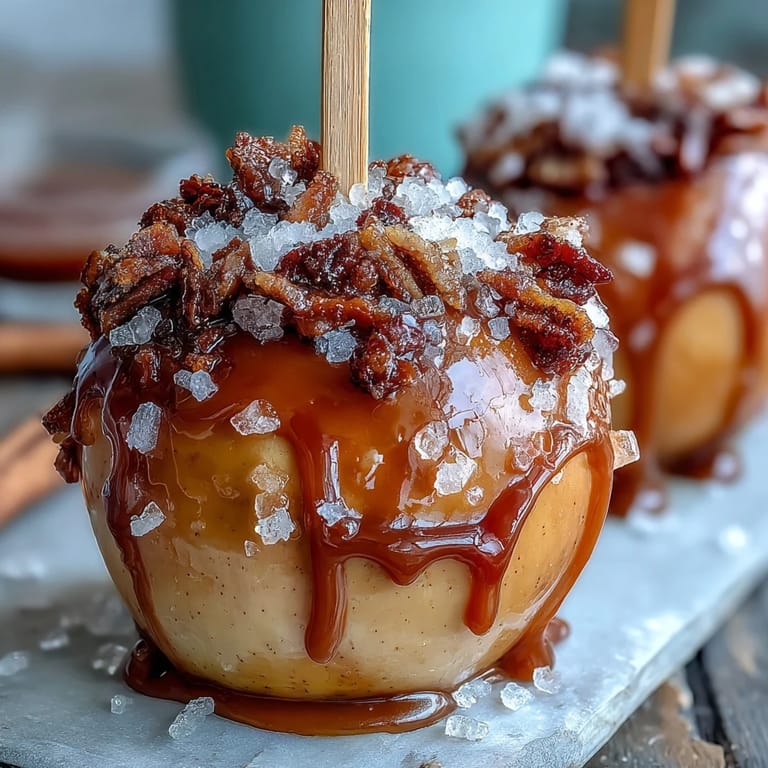
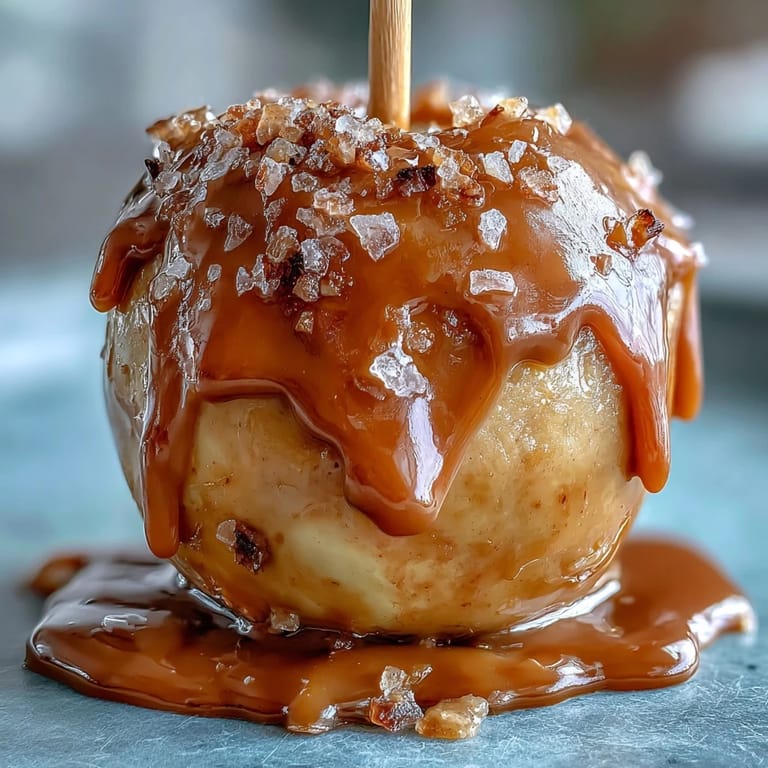
Save There's something magical about the first bite of a caramel apple—the crisp crack of tart apple giving way to rich, buttery caramel that clings to every curve. These Caramel Dipped Candy Apples with Sea Salt take that nostalgic fall favorite and elevate it with a sophisticated twist: a delicate sprinkle of flaky sea salt that transforms sweet indulgence into a perfectly balanced treat. Made from scratch with real butter, brown sugar, and sweetened condensed milk, this homemade caramel is worlds away from store-bought versions. Whether you're celebrating autumn, hosting a Halloween party, or simply craving something special, these glossy, golden beauties deliver both visual appeal and unforgettable flavor.
Pin it The secret to perfect caramel apples lies in three key elements: selecting the right apples, achieving the ideal caramel consistency, and timing the sea salt sprinkle just right. Crisp, tart varieties like Granny Smith or Honeycrisp provide the perfect contrast to sweet caramel, while their firm flesh holds up beautifully under the coating. The caramel itself is cooked to exactly 240°F—the soft-ball stage—ensuring it sets firm but remains pleasantly chewy rather than rock-hard. And that finishing touch of flaky sea salt? It must be added while the caramel is still tacky, creating a flavor dimension that makes each bite utterly irresistible.
Ingredients
Tired of Takeout? 🥡
Get 10 meals you can make faster than delivery arrives. Seriously.
One email. No spam. Unsubscribe anytime.
- Apples: 8 small to medium crisp apples (e.g., Granny Smith, Honeycrisp), washed and thoroughly dried
- 8 sturdy wooden sticks (popsicle sticks or craft sticks)
- Caramel: 1 cup (225 g) unsalted butter
- 2 cups (400 g) packed light brown sugar
- 1 cup (240 ml) light corn syrup
- 1 can (14 oz/400 g) sweetened condensed milk
- 1/4 tsp fine sea salt
- 1 tsp pure vanilla extract
- Topping: 2–3 tsp flaky sea salt (e.g., Maldon), for sprinkling
Instructions
- Step 1: Prepare the apples
- Line a baking sheet with parchment paper and lightly grease it. Insert wooden sticks firmly into the apples through the stem end. Set aside.
- Step 2: Make the caramel base
- In a large, heavy-bottomed saucepan, melt butter over medium heat. Stir in brown sugar, corn syrup, sweetened condensed milk, and fine sea salt.
- Step 3: Bring to a boil
- Stir constantly with a heatproof spatula or wooden spoon until the mixture comes to a boil.
- Step 4: Cook to soft-ball stage
- Attach a candy thermometer to the pan. Continue stirring and cook the caramel until it reaches 240°F (115°C)—soft-ball stage (about 10–15 minutes).
- Step 5: Add vanilla
- Remove from heat immediately. Stir in the vanilla extract.
- Step 6: Cool slightly
- Allow caramel to cool for 2–3 minutes so it thickens slightly but is still pourable.
- Step 7: Dip the apples
- Dip each apple into the caramel, turning to coat evenly. Let excess drip off, then place on the prepared baking sheet.
- Step 8: Add sea salt
- While caramel is still tacky, sprinkle each apple lightly with flaky sea salt.
- Step 9: Let set
- Let apples set at room temperature for at least 30 minutes, or until caramel is firm.
Zusatztipps für die Zubereitung
Achieving perfect caramel apples requires attention to detail. First, ensure your apples are completely dry before dipping—any moisture will prevent the caramel from adhering properly. If your apples have a waxy coating, dip them in boiling water for a few seconds, then dry thoroughly with a clean towel. This removes the wax and creates better adhesion. When cooking the caramel, use a candy thermometer for accuracy; even a few degrees can mean the difference between perfectly chewy and too-hard caramel. Stir constantly to prevent scorching, especially as the mixture approaches 240°F. If you don't have a candy thermometer, test by dropping a small amount of caramel into cold water—it should form a soft, pliable ball. Let the caramel cool for 2–3 minutes before dipping; if it's too hot, it will slide right off the apples. Work quickly but carefully when dipping, and don't worry if the first apple isn't perfect—you'll get the hang of it by the second or third.
Varianten und Anpassungen
While these classic caramel apples with sea salt are delicious on their own, they also serve as a perfect canvas for creative variations. For a nutty crunch, roll freshly dipped apples in chopped toasted pecans, peanuts, or almonds immediately after coating. Chocolate lovers can drizzle melted dark chocolate over the set caramel in a decorative zigzag pattern, or dip the bottom third of each apple in tempered chocolate before adding the sea salt. For a fall-spiced version, add 1/2 teaspoon of cinnamon and a pinch of nutmeg to the caramel along with the vanilla extract. You can also experiment with different finishing salts—try smoked sea salt for depth, or a combination of flaky salt and crushed freeze-dried raspberries for a fruity twist. For smaller portions, use lady apples and reduce the dipping time slightly. Kids will love mini caramel apple slices: cut apples into thick rounds, remove the core with a small cookie cutter, insert a stick, and dip as directed for bite-sized treats.
Serviervorschläge
These stunning caramel apples deserve a presentation that matches their beauty. Arrange them upright on a rustic wooden board or vintage cake stand for a charming autumn display at parties or gatherings. For individual servings, wrap each apple in clear cellophane tied with raffia or seasonal ribbon—they make wonderful homemade gifts or party favors. If serving at a dessert table, surround the apples with scattered fall leaves, mini pumpkins, or cinnamon sticks for festive ambiance. For easier eating, slice the apples into wedges after the caramel has fully set; arrange the slices on a platter with small forks for a more refined presentation. Pair with hot apple cider, spiced chai, or creamy hot chocolate for the ultimate fall indulgence. These apples are best enjoyed within 2–3 days of making, stored at room temperature in a cool, dry place. Avoid refrigeration, as it can cause the caramel to become sticky and the apples to release moisture.
 Pin it
 These Caramel Dipped Candy Apples with Sea Salt capture everything wonderful about homemade fall treats—the satisfying process of creating something beautiful from scratch, the joy of sharing seasonal flavors with loved ones, and the simple pleasure of that first sweet-salty-tart bite. Unlike store-bought versions made with shortcuts and artificial ingredients, these apples showcase the pure, rich flavor of real butter and brown sugar caramel, enhanced by just the right amount of flaky sea salt. Whether you're continuing a beloved family tradition, introducing children to the magic of candy-making, or simply treating yourself to something special, this recipe delivers results that look professional and taste extraordinary. So gather your crisp apples, break out that candy thermometer, and embrace the delicious mess of making caramel apples at home. The glossy, golden results—and the smiles they bring—are absolutely worth it.
Frequently Asked Questions
- → What type of apples work best for dipping?
Choose small to medium crisp apples like Granny Smith or Honeycrisp that have no wax coating for better caramel adhesion.
- → How do you know when the caramel is ready?
The caramel should reach 240°F (115°C), known as the soft-ball stage, indicating it’s thick enough to coat the apples evenly.
- → Why add flaky sea salt to the apples?
Flaky sea salt provides a delightful contrast to the sweetness of the caramel, enhancing the overall flavor with a subtle salty crunch.
- → Can I prepare the caramel in advance?
Yes, caramel can be made ahead and gently reheated to a pourable consistency before dipping the apples.
- → What tools are essential for making these caramel apples?
A heavy-bottomed saucepan, candy thermometer, wooden spoon or heatproof spatula, baking sheet, parchment paper, and sturdy wooden sticks are key for best results.