 Save
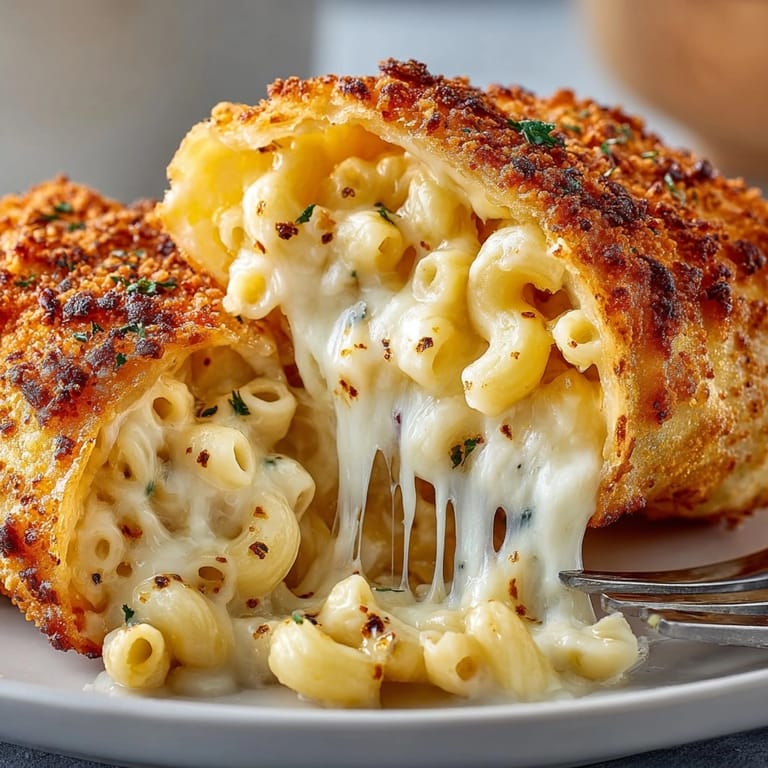
Save Mac and cheese spring rolls transform familiar comfort food into a fun crispy appetizer that disappears quickly at any party or game night I started making these when my kids asked for something extra special on movie nights and now every gathering we host is not complete without a batch on the table
These always remind me of my daughter’s birthday party when the tray barely made it to the table before people started grabbing seconds
Ingredients
- Elbow macaroni: gives the signature bite and holds creamy sauce well Choose brands that cook up plump and tender
- Unsalted butter: for smooth rich roux go with high quality for best flavor
- All purpose flour: thickens the cheese sauce Look for unbleached varieties for a cleaner taste
- Whole milk: makes the sauce extra creamy Use fresh dairy for the silkiest texture
- Shredded sharp cheddar cheese: adds bold flavor and color I love using a block and shredding it fresh for easy melting
- Shredded mozzarella cheese: gives oozy stretch and melt Choose low moisture so filling is not watery
- Salt and black pepper: bring out the cheese flavors Always taste and adjust before assembly
- Cayenne pepper: for a hint of heat optional but a tiny pinch wakes up the cheesy filling
- Spring roll wrappers: keep everything snug and crisp Seek out wrappers without tears and keep them covered so they stay pliable
- Egg: acts as a natural sealant beating it well makes for a secure roll
- Vegetable oil: with a high smoke point lets the rolls fry golden and even I favor peanut or canola depending on allergies
Tired of Takeout? 🥡
Get 10 meals you can make faster than delivery arrives. Seriously.
One email. No spam. Unsubscribe anytime.
Instructions
- Cook the Macaroni:
- Boil elbow macaroni according to package directions in salted water until just al dente Drain completely and set aside to prevent overcooking
- Make the Cheese Sauce:
- Melt butter in a saucepan over medium heat Add flour and whisk constantly for about one minute to cook off any raw taste
- Thicken the Sauce:
- Slowly pour in milk while stirring non stop to avoid lumps Let the mixture simmer two to three minutes until it thickens slightly
- Add the Cheeses:
- Reduce heat then add shredded cheddar and mozzarella Stir until both cheeses are fully melted and the sauce is smooth Season the sauce with salt pepper and a pinch of cayenne if you want more kick
- Combine Pasta and Sauce:
- Add cooked macaroni to the warm sauce Stir until every noodle is coated well Let this mixture cool for ten to fifteen minutes so it firms up
- Assemble the Spring Rolls:
- Lay out a spring roll wrapper on a clean counter with one corner pointing at you Place two generous tablespoons of cooled mac and cheese near the lower corner
- Roll It Up:
- Fold the bottom corner over the filling Tuck in the sides then roll upward as tightly as you can For a perfect seal brush a little beaten egg on the top corner before you finish rolling
- Repeat and Prepare:
- Continue filling rolling and sealing with all wrappers and filling Keep the formed rolls covered with a damp towel to prevent drying
- Fry the Rolls:
- Heat vegetable oil in a deep pan to about one hundred eighty degrees Celsius or three hundred fifty Fahrenheit Use enough oil so the rolls float Fry them in batches for about three to four minutes each turning for even browning
- Drain and Serve:
- Lift the rolls out with tongs or a slotted spoon Place on paper towels so any excess oil drains Serve piping hot with your favorite dip
 Pin it
 I always look forward to tearing one open to see the melty cheese pull My favorite memory is my son rushing to the kitchen just by the smell these rolls make in hot oil
Storage Tips
Store any leftovers in an airtight container in the refrigerator for up to three days Always let them cool completely before sealing to keep the wrappers crisp Reheat in the oven at a high temperature for the crunchiest result
Ingredient Substitutions
Swap the cheddar for your favorite cheese like Gruyere or Monterey Jack Try gluten free macaroni and wrappers for dietary needs For a dairy free version plant based cheeses and milk alternatives can work but the filling will be slightly less creamy
Serving Suggestions
Pair them with spicy ketchup ranch dipping sauce or sriracha mayo They make a fantastic buffer on a snack board with veggies and fruit I also like serving them with a simple green salad for lunch
Cultural and Historical Context
Mac and cheese hails from classic American comfort food while crispy spring rolls come from Asian traditions Marrying the two brings together nostalgia and novelty The fusion style has become a trend in creative kitchens around the world
Seasonal Adaptations
In spring stir in chopped scallions for brightness
In autumn mix in roasted butternut squash puree with the cheese
Use jalapenos and pepper jack cheese in summer for zing
Helpful Notes
Chill the filling before rolling for less mess
Baking instead of frying makes them lighter but still crisp
Overstuffing causes breakage roll snug but not too tight
Success Stories
A friend told me she made trays of these for her college study group and they disappeared so fast one batch was not enough I once served these on New Year’s Eve with a trio of dips and they became the highlight of the night
Freezer Meal Conversion
Form the spring rolls as usual but do not fry Arrange them on a baking sheet lined with parchment freeze until solid then transfer to a freezer bag Direct from freezer to fryer or hot oven just add one to two minutes to cooking time
 Pin it
 These delightful mac and cheese spring rolls are a guaranteed crowd-pleaser perfect for any occasion Serve them hot for the ultimate crispy and gooey experience
Frequently Asked Questions
- → What type of cheese works best?
A mix of sharp cheddar and mozzarella creates a creamy yet flavorful filling, but feel free to experiment with your favorites.
- → Can these be baked instead of fried?
Yes, brush the rolls with oil and bake at 200°C (400°F) for 18–20 minutes, turning halfway for even crispness.
- → How should I serve them?
Serve hot and crispy with dips like spicy ketchup, ranch, or sriracha-mayo for extra flavor.
- → How do I keep the filling creamy?
Let the cheese mixture cool before filling to prevent excessive moisture and ensure a firm, creamy bite.
- → What other fillings can I add?
Try stirring in scallions, crumbled bacon, or a dash of your favorite hot sauce for added taste and texture.
- → Are these suitable for vegetarians?
Yes, as prepared, they are vegetarian-friendly, provided the cheese and wrappers are rennet-free.