 Save
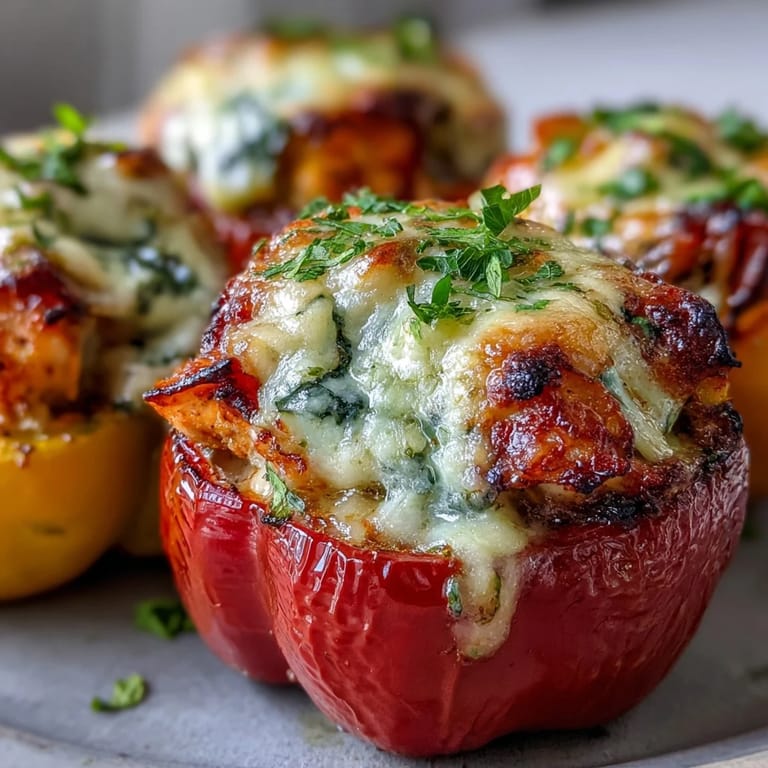
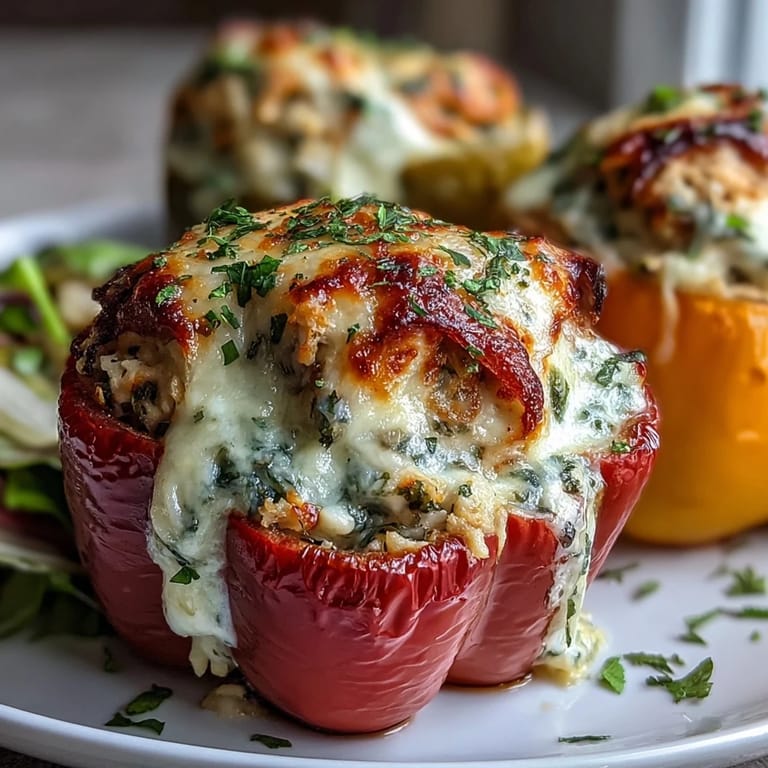
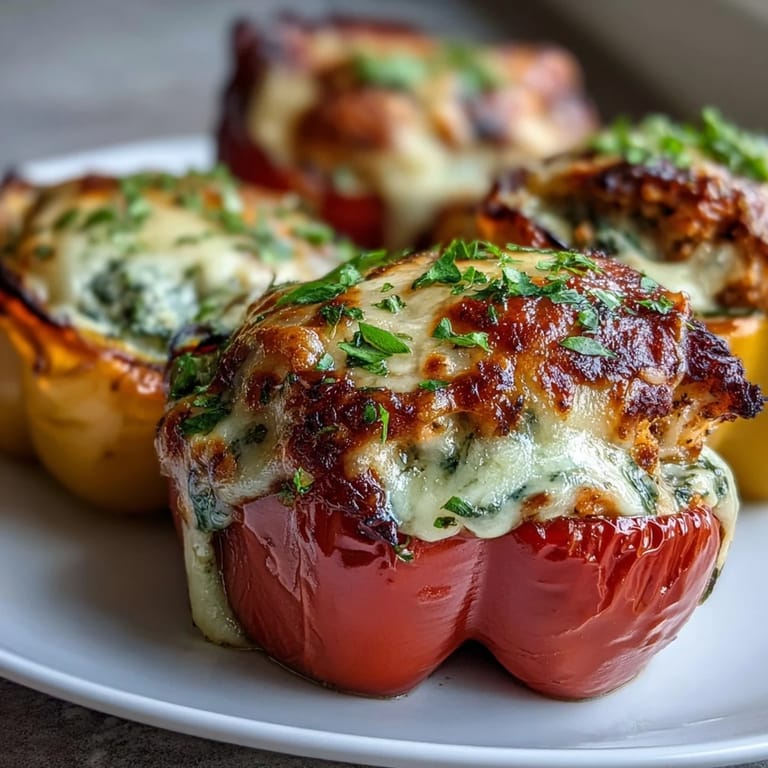
Save There's something almost meditative about hollowing out a bell pepper, watching the seeds tumble into the sink while the kitchen fills with that bright, vegetal smell. My neighbor brought over a casserole dish of stuffed peppers one autumn evening, and I was struck by how elegant they looked lined up in her baking dish—nothing fancy, just vibrant colors peeking through a golden cheese crust. That night, I went home and started experimenting, determined to crack the code on making them creamy rather than dry. This garlic Parmesan version became my answer: tender peppers cradling a luxurious filling that reminds me why comfort food doesn't need to be complicated.
I made this for my sister's book club last spring, and watching everyone come back for seconds told me everything I needed to know. Someone asked if the creamy filling was sour cream (it wasn't), and that question made me realize how rich and luxurious the heavy cream and Parmesan make each bite. That night, the peppers disappeared, the salad stayed mostly full, and I found myself grinning in the kitchen knowing I'd nailed something people actually wanted to eat.
Ingredients
- Bell peppers (4 large, any color): Pick firm ones without soft spots; the color doesn't matter for taste, but I love mixing them for a prettier presentation that catches the light in the oven.
- Cooked chicken (2 cups, shredded or diced): Rotisserie chicken from the grocery store saves you time without sacrificing flavor—I learned this after realizing homemade and store-bought taste nearly identical once they're mixed into the creamy sauce.
- Cooked rice (1 cup white or brown): If you're using leftover rice, this dish becomes even easier; brown rice adds a subtle nuttiness if you want something different.
- Heavy cream (1 cup): Don't skimp here—it's what transforms this from bland to memorable, creating a sauce that clings to every grain of rice.
- Parmesan cheese (1 cup, freshly grated): Grate it yourself if you can; pre-shredded cheese contains anti-caking agents that make the sauce slightly grainy instead of silky.
- Mozzarella cheese (1/2 cup, shredded): This is purely for the golden top; it melts faster than Parmesan and gives you that pull-apart cheese magic.
- Garlic (2 cloves, minced) and onion (1 small, diced): These build the aromatic base that makes your kitchen smell incredible while everything cooks—don't rush this step.
- Olive oil (2 tablespoons): Just enough to prevent sticking without making the filling greasy.
- Italian seasoning (1 teaspoon): This is your flavor anchor; if you have fresh herbs like basil or oregano, use those instead for even brighter taste.
- Salt and black pepper: Taste the filling before stuffing the peppers and adjust seasoning; peppers themselves are mild and deserve proper seasoning to shine.
Tired of Takeout? 🥡
Get 10 meals you can make faster than delivery arrives. Seriously.
One email. No spam. Unsubscribe anytime.
Instructions
- Get your oven and dish ready:
- Preheat to 375°F and lightly grease a baking dish that fits your peppers snugly upright. This prevents them from tipping or rolling around while they bake.
- Prep the peppers:
- Slice off the tops, shake out all those seeds and white membranes—these are bitter and you want them gone. Stand them cut-side up in your dish like little edible vessels waiting to be filled.
- Sauté your aromatics:
- Heat olive oil in a large skillet over medium heat and add diced onion, letting it soften for about three minutes until it turns translucent and sweet-smelling. Add minced garlic for just one minute more; you want it fragrant but not brown and bitter.
- Build the filling:
- Stir in your shredded chicken, cooked rice, Italian seasoning, salt, and pepper, mixing everything together so it's evenly seasoned. This is where you can taste and adjust—add more salt if it seems flat, or more pepper if you like heat.
- Make it creamy:
- Pour in the heavy cream and three-quarters of your Parmesan, stirring constantly until the mixture becomes silky and heated through, about three to four minutes. The cheese melts into the cream and creates this luxurious sauce that's honestly the star of the show.
- Stuff the peppers:
- Spoon the creamy mixture evenly into each pepper, filling them generously but not overflowing. Top each one with a sprinkle of mozzarella and a bit of the remaining Parmesan.
- First bake with foil:
- Cover the baking dish loosely with foil and bake for twenty-five minutes; this steams the peppers gently so they soften without the cheese browning too fast. You're aiming for peppers that are tender but still hold their shape.
- Finish golden:
- Remove the foil and bake for another ten to fifteen minutes, watching until the cheese on top turns golden and the peppers are completely tender when pierced with a fork. This is when your kitchen smells like something restaurant-quality.
- Final flourish:
- Sprinkle fresh chopped parsley over the top before serving if you have it; it adds a bright note and makes everything look finished and intentional.
 Pin it
 My husband came home while these were baking and stood in the doorway just breathing in, asking what was for dinner in that specific tone that means he's already decided he's staying. There's something about the smell of garlic, cream, and melting cheese that feels like you've been cooking all day even though you haven't. Food like this reminds me that dinner doesn't need to be complicated to feel special.
Timing and Temperature Matter More Than You'd Think
The first time I made these, I skipped the foil step entirely and ended up with dried-out peppers and burnt cheese on top—a harsh lesson that taught me why that two-stage baking method exists. The foil traps steam, cooking the peppers gently while protecting the cheese from the direct heat of the oven. Once the foil comes off, the cheese gets those golden, crispy edges while the pepper flesh stays tender and juicy underneath. This balance is everything, and once you nail it, you'll never second-guess it again.
Variations That Actually Work
I've added sautéed mushrooms, fresh spinach, and even crumbled crispy bacon to this filling, and each version tastes completely different despite following the same base recipe. The beauty of stuffed peppers is that the creamy sauce carries flavor well, so anything you add has room to shine without getting lost. I once threw in some roasted red peppers I had sitting in my fridge, and the sweetness was unexpected in the best way—it's worth experimenting to find your version.
Serving and Storage Wisdom
These peppers taste incredible fresh from the oven when that cheese is still slightly warm and gooey, but they also reheat beautifully, making them perfect for meal prep or leftovers. I've found that covering them loosely with foil and reheating in a 325°F oven for about fifteen minutes brings back that just-baked quality without drying anything out. A simple green salad on the side brightens everything, cutting through the richness with fresh acidity, and if you want to feel a bit fancy, a glass of crisp white wine pairs wonderfully.
- Make these up to a day ahead; assemble everything in the baking dish, cover with foil, and refrigerate until you're ready to bake—just add five to ten minutes to the cooking time if baking straight from cold.
- Leftover stuffed peppers keep in the fridge for three days and freeze beautifully for up to two months, so feel free to make a double batch.
- If your peppers are particularly large or oddly shaped, they might need an extra few minutes in the oven, so let appearance guide you more than the clock.
 Pin it
 These stuffed peppers became my default dish whenever I wanted to impress someone without spending the whole day in the kitchen, which means they've appeared at more tables than I can count. There's real joy in serving something that looks elegant, tastes restaurant-quality, and somehow still feels like home.
Frequently Asked Questions
- → Can I make these ahead of time?
Yes, you can assemble the peppers up to 24 hours in advance and store them covered in the refrigerator. Bake when ready, adding a few extra minutes if baking from cold.
- → What other proteins work well?
Ground turkey, sausage, or diced ham make excellent substitutions for the chicken. Adjust seasoning accordingly based on the protein chosen.
- → Can I freeze these stuffed peppers?
Absolutely. Assemble unbaked peppers, wrap tightly in foil and freeze for up to 3 months. Thaw overnight in the refrigerator before baking as directed.
- → How do I know when the peppers are done?
The peppers should be tender when pierced with a fork, and the cheese on top should be melted and golden brown. This typically takes 35-40 minutes total baking time.
- → Can I use different colored peppers?
Yes, red, yellow, orange, or green bell peppers all work well. Red and yellow tend to be sweeter, while green offer a slightly more bitter bite.
- → What can I substitute for heavy cream?
Half-and-half or evaporated milk can be used, though the sauce will be less rich. For a dairy-free option, try full-fat coconut milk.