 Save
Save My coworker showed up to the office with a pink velvet cupcake one February afternoon, and I watched three people stop mid-conversation just to ask where she got it. Turns out she'd made them the night before for her roommate's birthday, and something about that casual act of sweetness stuck with me. Now whenever Valentine's Day rolls around, I find myself mixing up a batch of these—not because I feel obligated to, but because there's something genuinely joyful about baking something this unapologetically pink and soft.
I brought these to a small gathering last year where nobody was expecting dessert, and I watched the conversation actually pause when people took their first bites. My friend Sarah said the frosting reminded her of cheesecake, which somehow felt like the highest compliment. That's when I realized this recipe works because it doesn't try to be complicated—it just gets the basics right and lets them shine.
Ingredients
- All-purpose flour (1 1/4 cups): This is your foundation, and measuring by weight instead of cups makes a real difference in consistency if you have a scale.
- Cornstarch (1/4 cup): Here's the secret to that velvety tender crumb—it replaces some flour and keeps the cupcakes from becoming dense or dry.
- Granulated sugar (1 cup): Standard sweetness, nothing fancy, but creaming it well with the butter is what traps air and keeps things light.
- Buttermilk (1/2 cup), room temperature: The acidity here reacts with the baking soda to create lift, and cold buttermilk can throw off your mixing—trust me on this one.
- Butter and vegetable oil (1/4 cup each): Using both gives you moisture from the oil while butter brings flavor; it's the balance that matters.
- Eggs (2 large), room temperature: Cold eggs don't incorporate smoothly, so pull them out of the fridge about ten minutes before you start baking.
- Vanilla extract (2 teaspoons total): Use good quality vanilla if you can; it makes a noticeable difference in such a simple cake.
- White vinegar (1 teaspoon): This might sound random, but it enhances the vanilla flavor and adds to that subtle tang that makes velvet cakes special.
- Pink gel food coloring (1–2 teaspoons): Gel gives you a true pink without watering down your batter the way liquid coloring does; start with less and add more until you get the shade you want.
- Cream cheese (8 oz), softened: This has to be genuinely soft or you'll end up with lumps no matter how much you beat it.
- Powdered sugar (2 1/2 cups), sifted: Sifting removes lumps and makes the frosting silky instead of gritty—one extra step that changes everything.
- Decorations (optional): Sprinkles, edible glitter, and fresh berries turn these from homemade to something that looks like it came from a proper bakery.
Tired of Takeout? 🥡
Get 10 meals you can make faster than delivery arrives. Seriously.
One email. No spam. Unsubscribe anytime.
Instructions
- Set up your workspace:
- Preheat your oven to 350°F and line your muffin tin with cupcake liners—I always line them up and grab a second tin nearby because it feels less crowded. This takes two minutes but saves you from the panic of rushing to fill warm pans.
- Build your dry base:
- Whisk together the flour, cornstarch, baking soda, and salt in a medium bowl, making sure everything is evenly distributed. This is where you're setting up the chemistry that'll make your cupcakes rise.
- Cream the fats and sugar:
- Beat the butter, oil, and sugar together for about two minutes until it's pale and fluffy—listen for the mixer to sound lighter and airier than when you started. This is crucial because you're literally whipping tiny air bubbles into the mixture that'll help the cupcakes rise.
- Add eggs with intention:
- Add one egg at a time, beating well after each addition so it fully incorporates before you add the next one. This might seem fussy, but it keeps your batter smooth instead of separated and curdled.
- Introduce vanilla and vinegar:
- Mix in the vanilla extract and white vinegar—the vinegar won't taste sharp, I promise, but it'll add a subtle complexity to the flavor. You'll smell it for just a second and then it disappears into the batter.
- Add your pink:
- Start with one teaspoon of gel food coloring and mix thoroughly, checking the shade before you add more. Remember that the color deepens slightly as it bakes, so if you're going for a pale pink, hold back a little.
- Alternate your wet and dry:
- Add the dry ingredients and buttermilk in three parts, starting and ending with the dry ingredients—this prevents overmixing and keeps the batter tender. Mix only until you don't see any streaks of flour; stop before you're tempted to keep going.
- Fill the liners:
- Divide the batter evenly among your cupcake liners, filling each about two-thirds full so there's room for them to rise without overflowing. I use a small ice cream scoop for this because it's faster and more even than a spoon.
- Bake with patience:
- Bake for eighteen to twenty minutes, or until a toothpick inserted in the center comes out clean with just a few moist crumbs. The tops should be set but still slightly springy when you touch them.
- Cool strategically:
- Let the cupcakes cool in the pan for five minutes so they firm up, then transfer them to a wire rack to cool completely. This prevents them from breaking apart when you move them, and it stops the bottoms from continuing to bake from residual heat.
- Make your frosting:
- While the cupcakes cool, beat the softened cream cheese and butter together until creamy and smooth—this usually takes about two minutes. Gradually add the sifted powdered sugar, vanilla, and salt, beating until light and fluffy, which takes another two to three minutes.
- Frost with confidence:
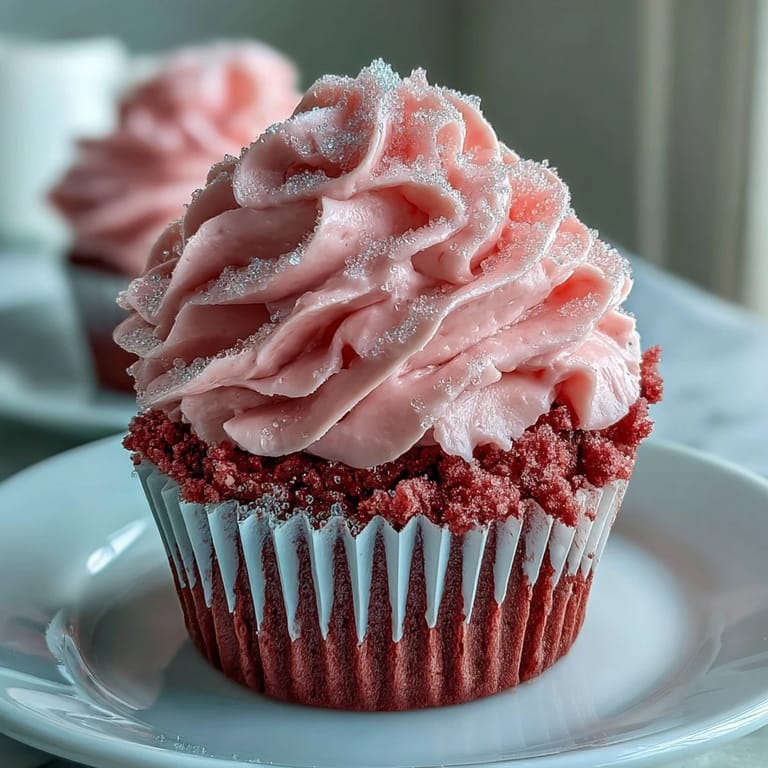
- Once the cupcakes are completely cool, frost generously using a piping bag for that bakery look or a spatula if you prefer something more rustic. Either way, you're creating a beautiful canvas for whatever decorations you choose.
- Decorate your creation:
- Top with pink or red sprinkles, edible glitter, or fresh raspberries and strawberries for that Instagram-worthy moment. The fresh fruit adds a slight tartness that balances the sweetness beautifully.
 Pin it
 There's a moment when you frost these and step back and realize you've made something that doesn't just taste good but looks genuinely beautiful. It happened to me mid-February, standing in my kitchen with pink frosting on my hands, and I felt this small spark of pride about creating something from scratch that made people happy.
The Magic of Velvet Cake
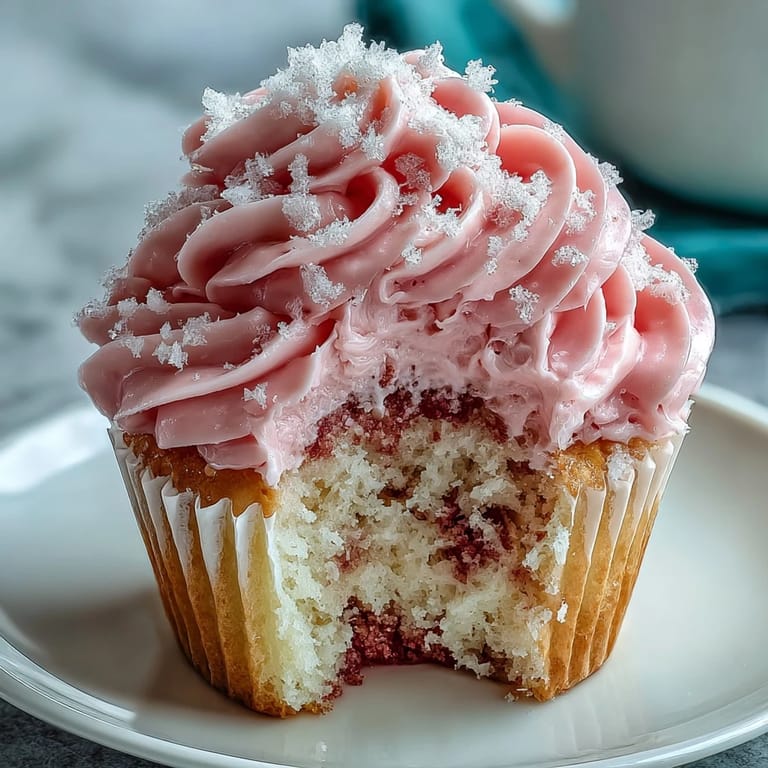
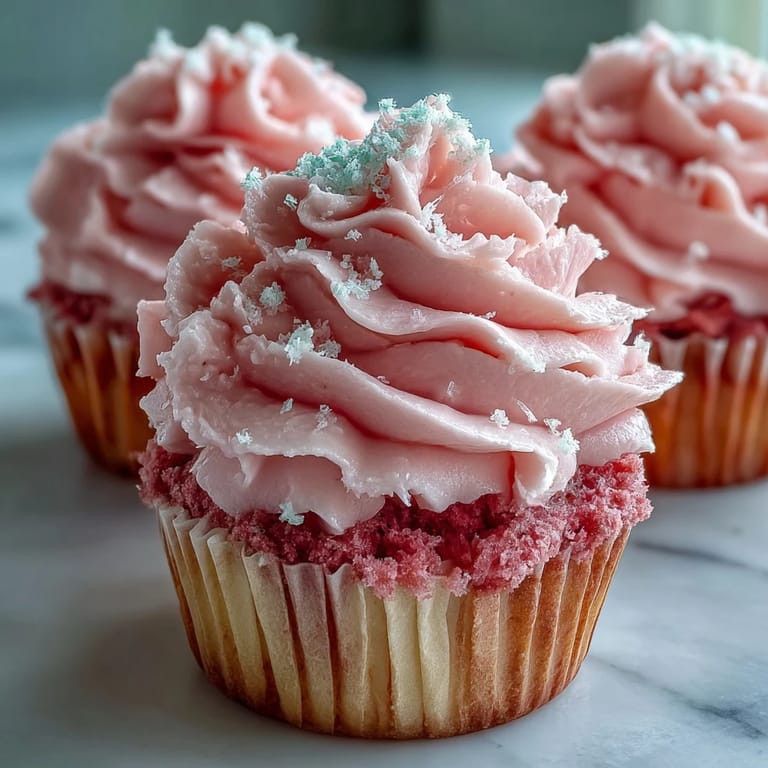
Velvet cake sounds fancier than it actually is—it's really just cake that uses cornstarch alongside regular flour and combines buttermilk with vinegar to create that signature tender crumb. The pink color is entirely your choice, from barely blushed to dramatic fuchsia, and neither is wrong. What makes velvet different from regular cake is this subtle softness that feels almost luxurious, like something between cake and custard in texture.
Frosting That Actually Tastes Like Cream Cheese
So many cream cheese frostings are more butter than cream cheese, which means you miss out on that tangy richness that makes this frosting special. This version keeps the balance by using equal parts cream cheese and butter, sifting the powdered sugar so there are no hidden grittiness, and not overmixing once the sugar is in. The pinch of salt is tiny but important because it cuts through the sweetness and makes the whole thing feel more sophisticated than you'd expect from a basic recipe.
Celebration Worthy and Completely Forgiving
What I love most about this recipe is that it doesn't demand perfection to turn out beautifully—the cupcakes stay moist, the frosting is hard to mess up, and even if your decorating skills are nonexistent, fresh berries on top make everything look intentional. I've made these for people who don't even like pink, and they've come around because the flavor is genuinely good, not just a pretty color masking something mediocre. Whether you're celebrating Valentine's Day, someone's birthday, or just deciding that Tuesday deserves cupcakes, these deliver.
- Make these cupcakes up to two days ahead and store them unfrosted in an airtight container to keep them fresh.
- If you're decorating ahead, frost them a few hours before serving and keep them in the refrigerator, then bring them to room temperature just before people eat them.
- The frosting is forgiving enough to spread with a regular knife if you don't have a piping bag, though a bag does make you feel like a professional.
 Pin it
 These cupcakes have become my go-to when I want to make someone smile without overthinking it. They're simple enough to feel achievable but thoughtful enough to feel special.
Frequently Asked Questions
- → What gives the cupcakes their pink color?
Pink gel food coloring is added to the batter to achieve the vibrant pink shade, offering better color intensity than liquid options.
- → How do I achieve a tender crumb in these cupcakes?
Incorporating buttermilk and gently alternating wet and dry ingredients ensures a moist, tender crumb without overmixing.
- → Can I prepare the frosting ahead of time?
Yes, the cream cheese frosting can be made in advance and refrigerated; bring it to room temperature and rebeat before frosting.
- → What is the best way to decorate these cupcakes?
Decorate with pink or red sprinkles, edible glitter, or fresh raspberries and strawberries for a festive and colorful finish.
- → How long can the cupcakes be stored?
Store cupcakes in the refrigerator for up to 3 days, then bring them to room temperature before serving for best texture.